Wednesday, October 31, 2012

Who wore it best?

Before my mom took her super duper awesome Angry Bird handmade costume to my nephew for his school Halloween party, I had to try it on myself first.

angry birds, DIY Angry Birds Costume

I'm just kidding about the title...obviously he wears it better...he won Best Costume at his school dance!  (Can you believe he's only 6 and goes to school dances???)


Here he is his with his little sister....you have no idea how appropriate this costume is for her~


And here's where my mom got the instructions, in case you want to make your own Angry Birds costume for next Halloween.

Tuesday, October 30, 2012

It's Time to Spool Knit!

Well, the calendar says it's fall but if I look outside my window it is most definitely winter.  I don't think the snow is going anywhere anytime soon, so you know what that means????  It's time to pull out your spool knitter!

If you're new to Etcetorize I'm going to point you to some posts from the past so that you'll know what I'm talking about and you can get ready for Friday's project.

Learn how to make your own spool knitter HERE:

spool knitter, spool knitting, Make your own spool knitter

Learn the basics of spool knitting HERE along with a few tips and tricks:

How to spool knit, how to knit

See last year's spool knitting projects HERE:

easy knitting, beginner knitting, DIY Scarf, DIY Cowl

and HERE:
easy knitting, beginner knitting, DIY Scarf, DIY Cowl

On Friday we're going to make another fun and very easy project to get you back into the swing of things.

Make sure you're ready!

This post was featured here:

Monday, October 29, 2012

Mini Journal Makeovers

Aren't these little mini composition books cute?!?!


They're so tiny, I thought they'd make perfect stocking stuffers for Christmas.

But they needed a little help...


Sooooo much better!  I even added matching pencils.


All it takes is some Mod Podge,  cute scrapbooking paper, embellishments, a glue pen, and glitter~

If you want to learn how to make your stocking, check out this blast from the past project HERE.

Do you still get a stocking from Santa?  Leave a comment below.

Friday, October 26, 2012

A Sign of Joy

I've got another Christmas project for you today and I know what you're thinking.  "What the heck is she doing!  We haven't even had Halloween yet!  What's with all the Christmas stuff?!?!"

Well, maybe it has something to do with THIS!


Yes, SNOW!  S-N-O-W!  And not just the little light shimmery pretty stuff that melts as soon as it hits something.  This is full blown, get the snow shovel out and start digging SNOW!

So, in an effort to love it and get in the winter mood (instead of crying myself asleep to dreams of faraway hot vacations) I'm trying to feel the JOY.

Christmas Sign, DIY Christmas Crafts, Joy Sign
                                                                            

Here's what you need:


Materials:
-3 small wooden picture frames
-acrylic paint, mod podge, 2 paint/sponge brushes
-papers (3 neutrals for backgrounds, 3 print to cover frames, 3 different print to make letters)
-staple gun and sharp edge or scissors
-optional: ink, glimmer mist, embellishments

Steps:
1) I had painted my frames hot pink to go with the decor in my studio before I did my mini-makeover.  Now they're just too loud.  I started by painting the inside and outside edges.  Don't worry about the flat front part, we're going to cover that with paper later.


2) While you're waiting for your paint to dry, use the insert from the frame as a template to cut three papers for backgrounds.


3) Once the paint is dry, use your frames to trace out three printed papers.


4) And now my favourite part...get out the Mod Podge!  Paint a layer of Mod Podge onto the front of your frame and place the paper you just cut down (right side up).


Normally you'd paint another layer of Mod Podge on top right away, but hold off, because we're going to add a little something to make your frames extra special!

5) If you have some Glimmer Mist on hand, give your frame a nice layer to add some beautiful shimmer.

I love my Sparkle Mod Podge, but this is just a slightly more
 subtle and sophisticated way of adding shine.

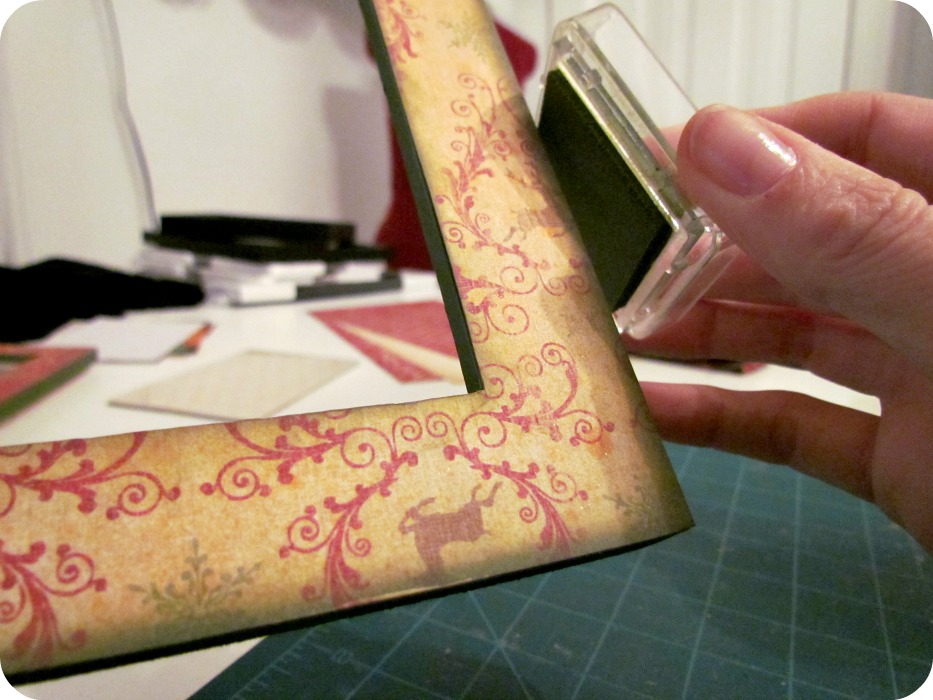
6) Ink around the edges of your frame in the same colour as the paint you used on the sides.  Ink both the inside and outside edges.

(pssst...here's a trick my friend Gen taught me...to get into the hard to get spaces,
 use a make-up sponge.  Just tap it onto your ink pad and then wipe and dab it onto your piece.  
It's more flexible and gets right into the corners)

7) OK, now you can go ahead and add the top layer of Mod Podge to seal all that work in.


8) Now we need something to put inside of these beautiful frames.  So, if you're lucky enough to have a cutting machine, cut out your letters, with a snowflake for the "O".  You can get creative with scissors and do it old school too.


9) Using your Mod Podge or some other adhesive, secure your letters to the background papers you cut way back in step 2 and then place inside of your frames.


10) Almost done!  Cut a looooooooooong piece of ribbon, fold it in half, knot it at the top, and staple it onto the back of your frames taking care to space the frames out evenly.


All right!  In the immortal words of Jane Fonda...CAN YOU FEEL IT?!?!  (You had to do the workout in the '80's to get that joke).  In any case, go ahead, feel the joy...


Hopefully the snow will melt this weekend and I can get back to regular crafting.

Have you started your Christmas crafting yet?  Leave a comment below~

This project was featured here:

Beyond The 
<br />
<a href=

Thursday, October 25, 2012

Tell a Tale: Cleopatra's Daughter


Let's take a trip back in time...waaaaaayy back~

“I don't think unhappiness is fated.”
Michelle Moran, Cleopatra's Daughter

Summary (from Goodreads):
Follows the incredible life of Cleopatra's surviving children with Marc Antony -- twins, named Alexander Helios and Cleopatra Selene, and a younger son named Ptolemy. All three were taken to Rome and paraded through the streets, then sent off to be raised by Octavia (the wife whom Marc Antony left for Cleopatra). Raised in one of the most fascinating courts of all time, Cleopatra's children would have met Ovid, Seneca, Vitruvius (who inspired the Vitruvian man), Agrippa (who built the Pantheon), Herod, his sister Salome, the poets Virgil, Horace, Maecenas and so many others!

Review:
I was really looking forward to reading this book, unfortunately I was very disappointed with it. I love all things ancient Egypt and Rome and am usually very forgiving when historical fiction authors play with real historical events but I think this one went a little too far.

The 'story' doesn't really start to move until the last quarter of the book and the freedom that the characters are given to say and do almost anything they want just doesn't seem plausible. The sub-plot was strange and unnecessary and really does a disservice to the memory of the real life characters that it involves.

I will continue to try to read Michelle Moran but sadly this one just wasn't for me.  I've read her other books that are set in ancient Egypt but am usually left wanting more or questioning the validity of the historical facts that are used.  Strangely enough, Michelle Moran seems to be highly regarded for her research skills.


Do you read this author?  Is it ok that I'm telling you about a book I'm not crazy about?  Leave a comment below or come visit me on Goodreads and leave your own review~

Juba II (Cleopatra Selene's husband) & Cleopatra Selene (the famous Cleopatra's daughter)

Wednesday, October 24, 2012

Holiday Card

I have a few friends who partake in the holiday madness but don't actually celebrate Christmas.  I thought this card might suit the occasion.


It's a great scrapbuster too!  Just cut a few rectangles, glue down, and throw a bow on top.  Voila~


This is the inspiration card I found pinterest:

                                                                    Source: jaymamalme.blogspot.com via Etcetorize on Pinterest

Tuesday, October 23, 2012

Stand Up!

Spread the word~


Check out more awesome Mike Tompkins acapella videos HERE.

Monday, October 22, 2012

O Christmas Tree

I may not have started on any of my Christmas gifts yet, but I've got a nice headstart on cards and tags.  Here's another quick and easy greeting you can send out:

DIY Christmas Card, Paper trees, DIY Christmas Trees, Christmas Crafts

The paper is from last year's EK Success Yuletide collection.

To make the trees, just cut out a circle with a scalloped edge, cut it in half, and fold it until it looks like a tree.  Glue it down, run a bead of glue along the edges (I used a glue pen for more accuracy), and add some glitter.

Tah dah!  Another card down....only about 10 more to go~

This project was featured here:
mop it up mondays feature

Friday, October 19, 2012

Turtleneck Makeover

I don't know if you've noticed or not, but I'm a bit of a bargain hunter.  I especially enjoy end of season sales because you can pick up all kinds of goodies for next to nothing and be all set for next year.  I try to stick to basics when I do this, that way it's sure to still be in style 12 months later.

Case in point....I got not one, but TWO perfectly good black turtleneck sweaters for a whopping total of 5 buckeroos!  Even the salesgirl was shaking her head at what a steal they were.

But I already have at least one black turtleneck in my closet (or maybe more).  So the whole reason I picked up two was so that I could play with them a bit.

We're going to go from sad, sad basic, to fun and sexy wardrobe staple in just two cuts and one seam!

deconstructed sweater, turtleneck to cowlneck, easy sewing
Please ignore the fact that my light fixture looks like a crown~
Here's what you need:


-2 sweaters, if you're a real trendsetter, they don't even have to match!
-thread, scissors, chalk
-sewing machine
-optional: serger

Steps:
1) Start by marking your sweater with the outline of a new, wider and slightly deeper neckline.  It doesn't have to be drastic.  Mine was widened about 3/4" on each side, tapering out to approximately 1.5"-1.75" in the centre front.  I also cut the back a bit too but wish I had left it closer to the original neckline, so don't take too much out here.

2) Once your happy with the new outline and are sure that it's symmetrical, cut it out.  Serge or zigzag your neckline edge as soon as possible to avoid fraying and stretching.


3) Set that piece aside and lay out your second sweater.  We're going to make this into a cowl for the neckline.  Mark and cut a line somewhere between the underarm area and bustline.  Again, serge or zigzag as soon as you can.


4) Now, pin the cowl to the body.  Be careful to make sure that the right side of the cowl is touching the inside or wrong side of the body and raw edges are even.  Your seam will end up on the outside.  That's OK, because once it's turned over the cowl will cover it up.  This way the side seams will also be finished on the outside.

It's that easy!  You're done!  Just turn the cowl out to the right side, try it on, and check out your new hot mama sweater!
Oooh la la!   Va va voom!   Hubba hubba!
So versatile~
We've already had a bit of snow here so I'm sure I'll be wearing this comfy number very soon.

And don't forget about those left over sleeves from the second sweater.  Just cut them off, serge the edge and you have a new pair of leg warmer/boot socks!


Some people have very strong feelings about turtlenecks...are you one of them?  Do you find them constricting or do you think they're cozy as a cocoon?  Leave a comment~

This project was featured here:

    It's a Blog Party
 

Linkwithin

Related Posts Plugin for WordPress, Blogger...